This article explains how to use Ditto with remote videoconferencing hardware like Poly Studio, Neat Bar, Logitech Rally Bar, and more. This setup will enable in-person and remote meeting attendees to share and view content during hybrid meetings.
Advantages of integrating Ditto with videoconferencing hardware in your meeting spaces:
- In-person attendees can share content from their devices with all attendees without needing to join the videoconference on their devices
- Simplified collaboration for in-person attendees
- Ability to show digital signage on meeting room displays while keeping the displays collaboration-ready
Meeting room requirements:
- A videoconferencing hardware solution like Poly Studio, Neat Bar, Logitech Rally Bar, etc.
- A Ditto Receiver connected to a videoconferencing hardware input
- The Ditto receiver must be set up in your Ditto Account Portal
How it Works
Note there may be slight differences to accommodate based on your videoconferencing hardware solution.
Step 1
Simply connect your Ditto Receiver to an available HDMI input on your videoconferencing hardware solution (like the HDMI input on a Polycomm Studio video bar, for example).
Step 2
Make sure your videoconferencing hardware is configured to switch to an active HDMI input. Some solutions will show HDMI-connected devices by default. Others may need to be configured to do this. Doing so will ensure that your videoconferencing hardware always shows Ditto connection instructions and/or digital signage on your display.
Step 3
Join a videoconference (Teams, Meet, Zoom, etc.) using the videoconferencing hardware user interface.
In-person attendees will be able to see remote attendees and vice versa.
Step 4
Use Ditto Connect on your computer, phone, or tablet to share content with the Ditto receiver connected to your videoconferencing hardware.
Meeting participants will now be able to see content being shared with the Ditto receiver.
Step 5 (if needed)
As referenced in step 2 above, if your videoconferencing hardware is not already set to share the Ditto receiver input, you will need to use the "Share" option (or equivalent) on your videoconferencing hardware user interface (a Polycomm table-top controller, for example) to share the Ditto receiver input. Otherwise, Ditto will not appear.
Step 6
Use the videoconferencing hardware user interface to adjust views as needed. You can choose to have shared content take up the entire screen or you can view shared content and remote attendee webcams simultaneously.
Both remote and in-person attendees can share content from their devices for everyone to see.
There are two important elements to consider:
Audio
When sharing to Ditto via Ditto Connect on Mac and Windows, the output audio is muted on the mirroring computer and played from the speakers of the display you are mirroring to by default.
If users wish to keep output audio local to the computer speakers, select the mute icon in the Ditto Connect app window (number 1 in the figure below).
Mobile devices are currently not able to send audio while participating in hybrid meetings via hardware videoconferencing solutions.
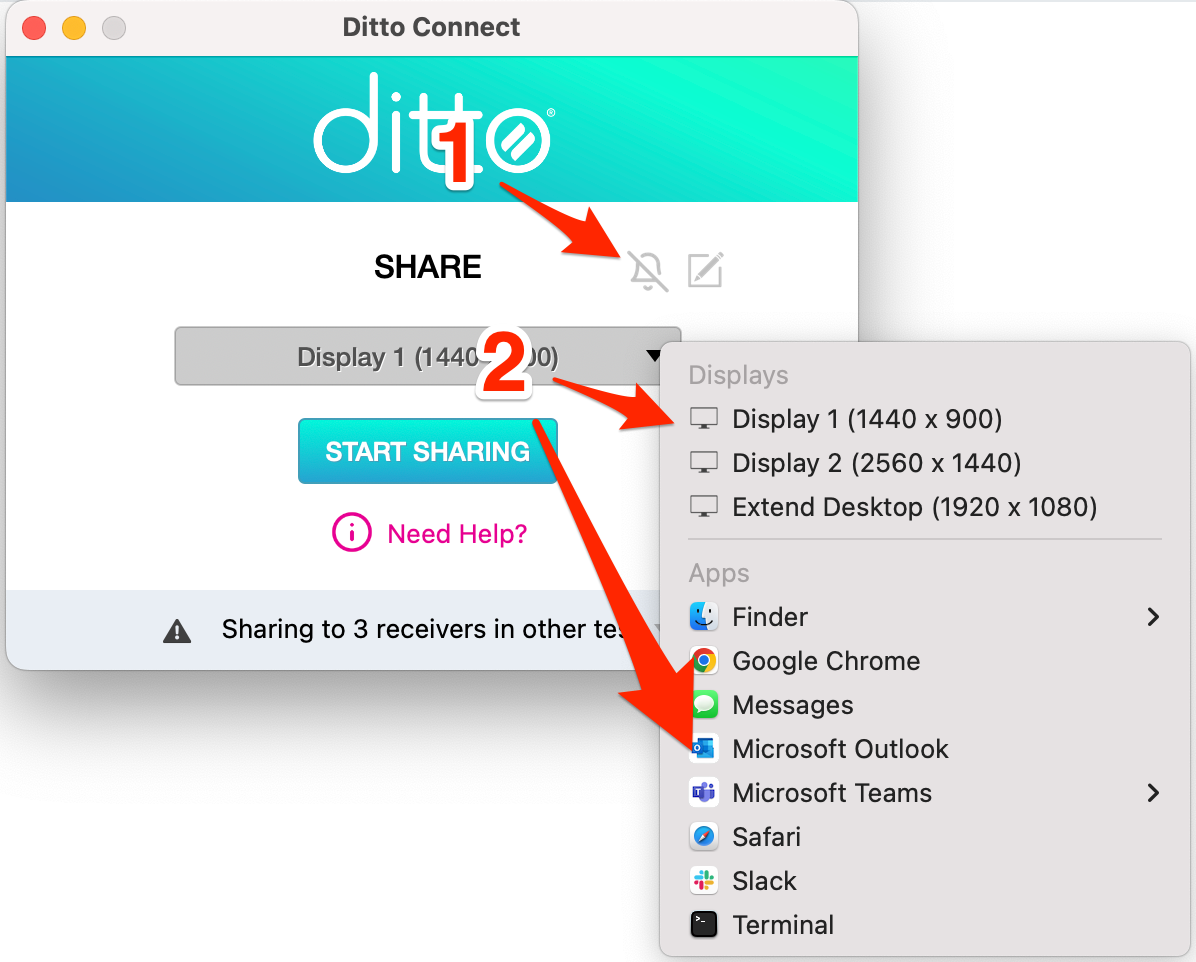
Mirrored Content
Ditto Connect for Mac and Windows users can choose to simply mirror an application or share the entire display.
In the Ditto Connect app, a dropdown menu shows what is being shared (number two in the figure above).
Note:
Application and browser windows that are minimized or fully obscured from view may not be rendered enough for Ditto to continue capture of content that is hidden from view on the screen.